ThreeJs Essentials | Before you Start
Chapter 1: ThreeJs Concepts and Inner workings you should know before you start

Introduction
This chapter will acquaint you with the inner workings of the ThreeJs library so you're already familiar with the concepts when we start coding,
Even if you skip all the following articles of this series, this article alone will help you make informed decisions throughout your Journey!

First we'll look at different kinds of rendering engines and how ThreeJs actually renders your 3D world onto a 2D Canvas on your screen.
Then we'll dive into the three fundamentals,
- Camera
- 3D Models
- Lighting and Shadows
We'll then get to see how the images you set to be textures get shrunk and magnified, and then conclude right after with a concise summary of the article with a little teaser for the next one 😊
So let's get into it ^^
How does ThreeJs Render? 📝
There are 3 main kinds of rendering techniques,
- Rasterization <-
- Ray Casting
- Path Tracing
RAY TRACING and other RENDERING METHODS by Andrey Lebrov is a great video that explains all these better than I do here, if you watch that, you can safely skip this section.
If videos aren't your thing though, stick with me here, here we go!
Rasterization
Rasterization (or rasterisation) is the task of taking an image described in a vector graphics format (shapes) and converting it into a raster image (a series of pixels, dots or lines, which, when displayed together, create the image which was represented via shapes). - wikipedia
ThreeJs uses Rasterization to render, mainly because it's the only one that can provide real-time rendering without owning a beefy high-cost PC.
It makes sense too, considering we want our 3D web experience to be widely accessible, we Need an app you can run with,

If you've ever used Blender, the Eevee engine uses Rasterization.
It works by storing every object's image along with their distance from the camera and then drawing the pixels that are closest to the camera and ignoring the rest.
The Blazing fast speed of renders don't come without a price though, Blender provides a breakdown of the limitations that Eevee faces here.
Largely the drawbacks are an inability to compute,
- Physically accurate shadows
- Recursive reflections
- Refraction
- Bounced lights
- Caustics
These limitations are quite the handicap, so we've come up with some clever ways to fake those effects, that aren't quite accurate but come passably close. Keep this at the back of your mind for now as we'll revisit this in Lighting and Shadows.
You can safely skip the next 2 sections (Ray Casting and Path Tracing) as while they are prominent 3D rendering methods, they have little to do with ThreeJs.
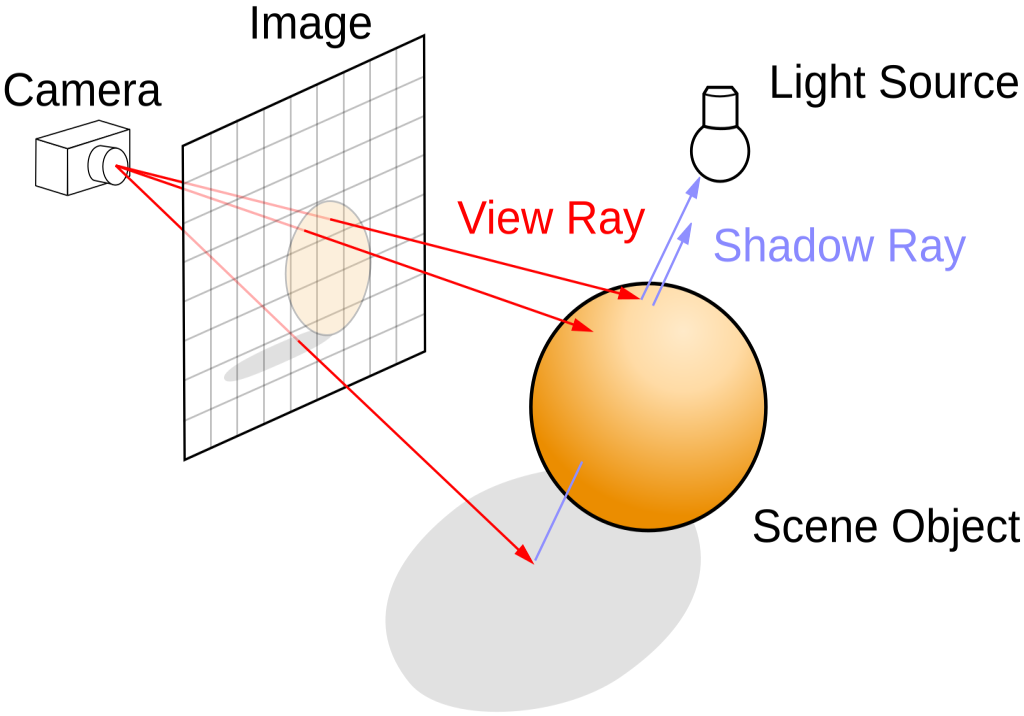
Ray Casting
Ray casting is the methodological basis for 3-D CAD/CAM solid modeling and image rendering. It is essentially the same as ray tracing for computer graphics where virtual light rays are "cast" or "traced" on their path from the focal point of a camera through each pixel in the camera sensor to determine what is visible along the ray in the 3-D scene. - wikipedia
It works like this,
- Cast a ray from the camera for every pixel out till the end of render distance.
- Look at the closest intersection point.
- Cast rays to all the lights from that point to calculate illumination.
- If the ray reaches a light without any other closer intersections, factor in its contribution.
Now you have the color of that point, draw it on the pixel.

This is still relatively performant but since it doesn't factor in light bounces it still pays a lot of the same prices that rasterization does.
Path Tracing
Path tracing is a computer graphics Monte Carlo method of rendering images of three-dimensional scenes such that the global illumination is faithful to reality. Fundamentally, the algorithm is integrating over all the illuminance arriving to a single point on the surface of an object. This illuminance is then reduced by a surface reflectance function (BRDF) to determine how much of it will go towards the viewpoint camera. This integration procedure is repeated for every pixel in the output image. - wikipedia
If you've ever used Blender, the Cycles engine uses Path Tracing.
When someone's talking about Ray Tracing, unless specified or context clued otherwise, it's safe to assume they're talking about this.
This follows the same process as Ray Casting but recursively repeats the process at intersection points to gain more accurate information about reflections, refraction and shadows.
This provides extremely photo realistic results, but it's something so computationally expensive that the time it takes to render once is in the magnitude of hours.
That's unless of course, you have your

Now that we have a basic idea of how the 3D world is actually rendered on a 2D Canvas, let's dive into the fundamentals of a ThreeJs Project Setup!
The Camera 📷
The camera is a vital part of a ThreeJs render, it's something that looks at your 3D world, also called the scene, and renders (draws) whatever it sees on the canvas element.
The number of drawings it can make in 1 second is called your frame rate, measured in fps (frames per second), the more complex your scene is, the more time it takes to draw and that causes a drop in your fps.
You should try to keep your frame rate around 60fps, anything too low causes your animation to feel laggy, anything below 24 shatters the illusion of the video entirely and starts to feel like still images.
We'll discuss more about what actually makes a scene complex in 3D models and Lighting.
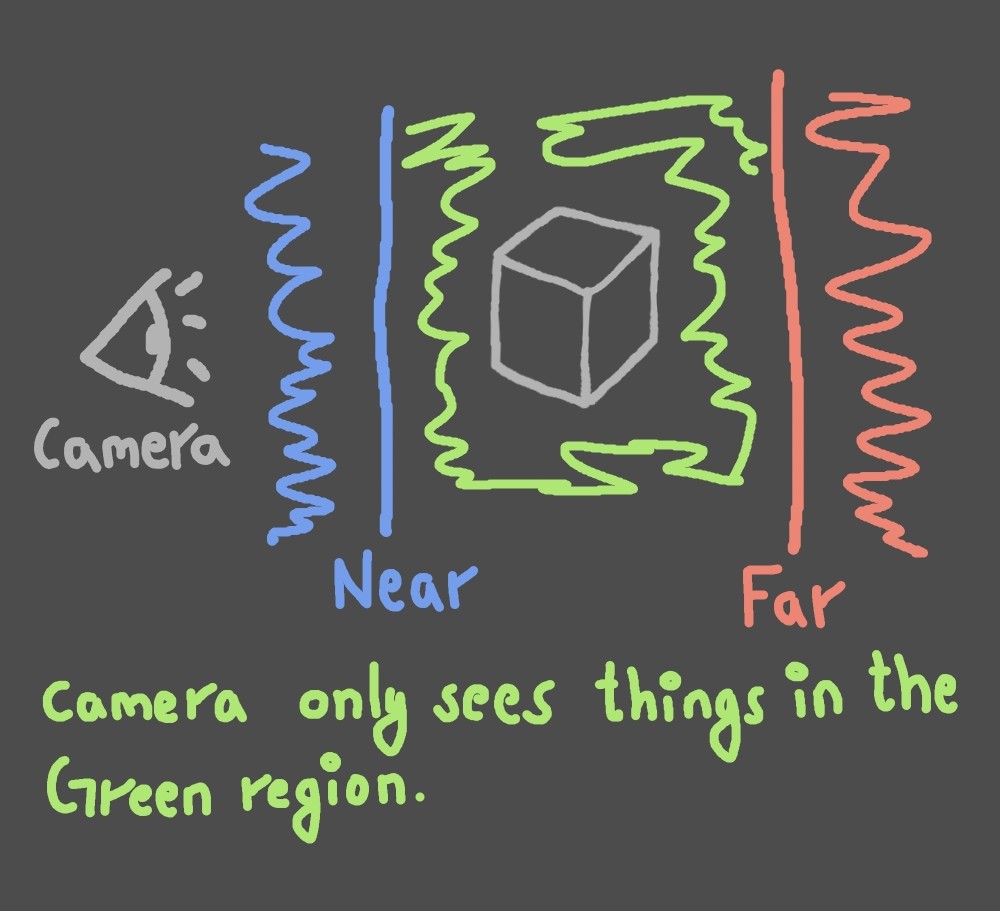
The Camera can take Near and Far values as parameters when created, the camera can only sees things between its near and far distances.
Try to keep it fairly tight as we don't want the camera to waste time looking for things at places we know are empty.
ThreeJs offers 2 types of Cameras, Perspective and Orthographic.
-> Perspective is designed to mimic the human eye and the cameras in the actual world, it's usually the one you'll want to use.
-> Orthographic is designed to give a flat and depth-less look. You'll want this if you're going for a more 2D vibe.
More about these ^ in detail in future chapters
Now that we know about Cameras, we need things to populate the scene and for the Camera to see : )
3D Models 🧘🏽
A complete 3D model is called a mesh.
There are 2 Components to 3D Models, the Geometry (shape) and the Material (texture).
3D Models come in many formats like .glb/.gltf, .fbx, .obj and more.
If you get your model from somewhere online, chances are you'll get it in one of these formats, it'll contain the entire model including both Geometry and Material.
The Geometry
It is the actual shape of the model.
Like images are made up of small pixels, A Geometry is made up of small triangles, why triangles? because it's the easiest shape for your GPU to calculate.
The number of these triangles is called the model's poly count, short for polygon count. Models with a high poly count are called high poly models, conversely those with a low poly count are called low poly models.
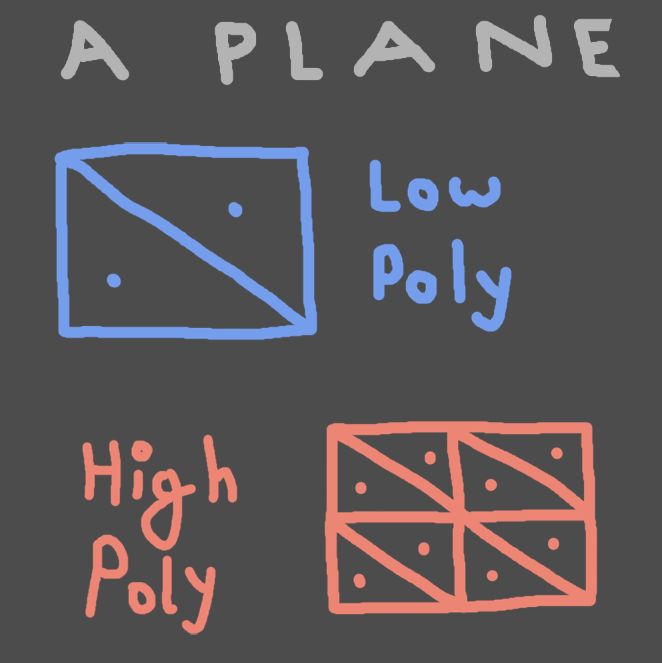
Higher poly models are more detailed and can offer greater realism but at a cost.
Essentially, increasing poly count increases the complexity of your scene.
The higher your Poly Count, the more data the Geometry needs to save that information, so high poly models tend be larger in file size, delaying a user's access to your web experience.
Not only that, high poly models require more computation to render, so they slow things down as well, causing lag on low end devices and with enough polygons, even on higher end ones.

That's why for our purposes, it's better to try and go with the lowest poly models we can to optimize our website.
Now that we know what Geometry is... how do we get it?
You can obtain Geometry in the following ways.
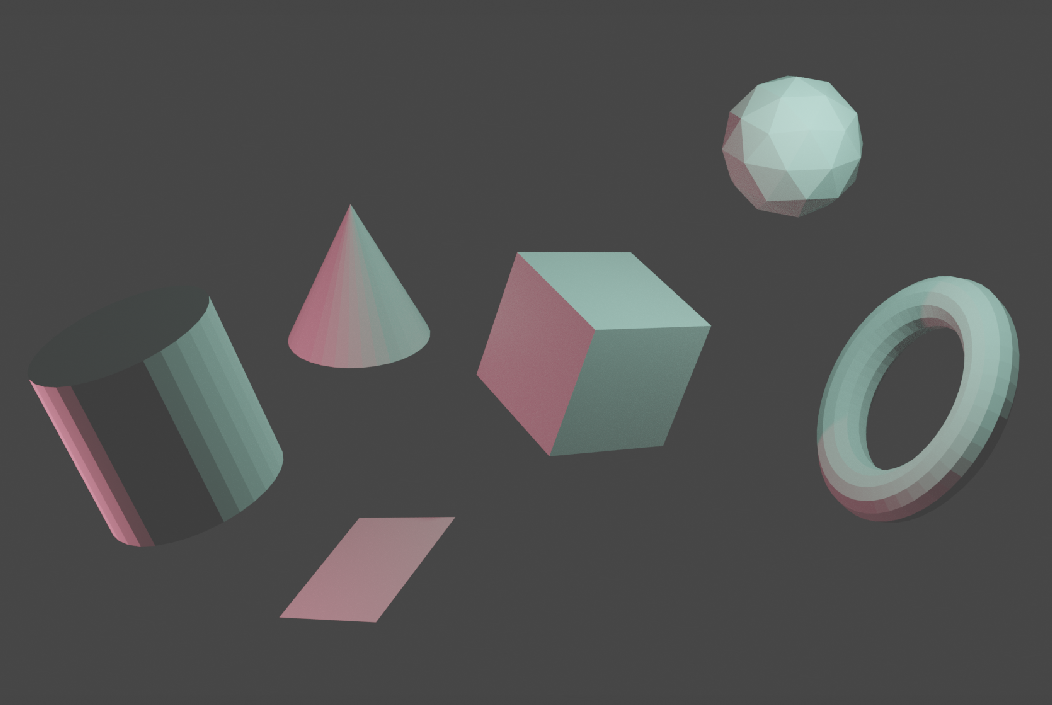
-> ThreeJs itself offers some primitive geometry for you to create in your scene.
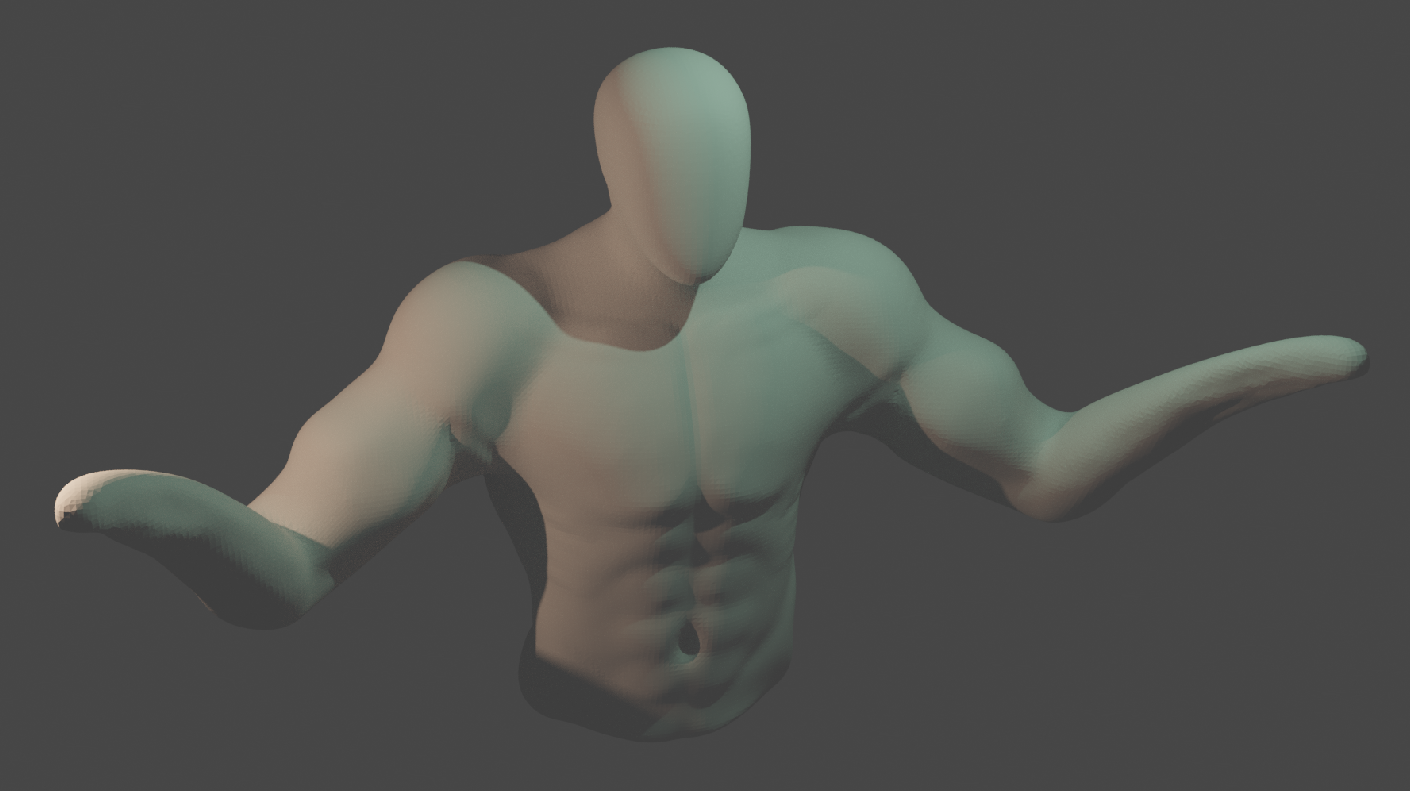
-> You could Create your own Geometry in 3D Programs like Blender or Z-Brush, this is something I created in blender in about 30 minutes as anatomy practice.
-> It is understandable though if you don't want to spend a significant chunk of your time practicing modelling and wanna jump straight to creating awesome websites.
You can checkout Mixamo for free 3D Character Models and Animations, You can also checkout websites like Poly Haven, CG Trader and SketchFab for free or paid models.
This is what I can list off the top of my head and I'm sure there are other great websites like these.
Okay so now we can create Geometry, something doesn't feel right though, does it have to be all dull and gray? Nope, Let's fix that with
The Material
The material is the texture of the object. It dictates how the object's surface looks.
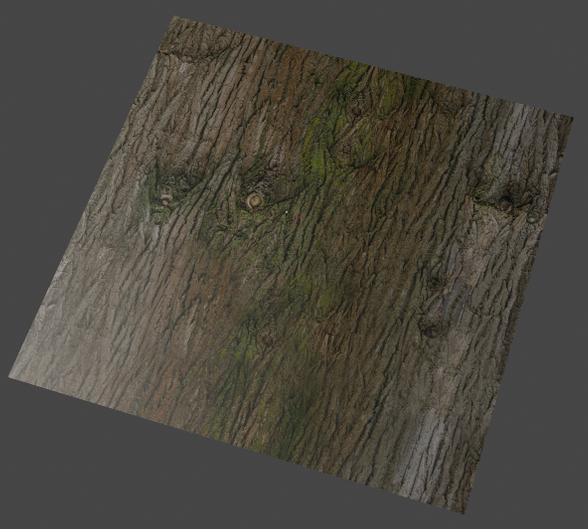
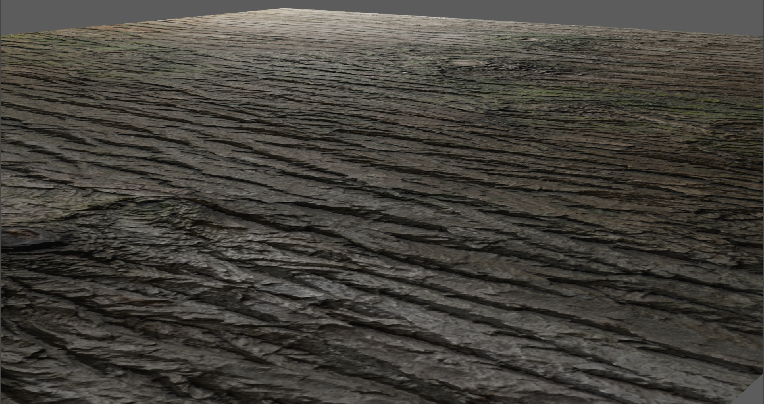
Say you have a plane, and you want it to look like tree bark, what we can do is just tell that plane to display an image of a tree bark, that's essentially how textures work, they're just polygons displaying images.
There's a flaw with that approach though, if we tell the plane to pretend to be an image, it's gonna look just that, a flat boring image, like we just pasted a printout on a flat piece of cardboard (which is kind of what we did).
Here's a visual on how it'll look.
And that makes sense because nothing in our world is truly flat, there's a lot of small irregularities in any surface we look at and usually different materials have different patterns of those irregularities.
If we had an ideal engine that could process a near infinite amount of light bounces and the amount of polygons in the order of 10 followed by 23 zeroes and someone who took the time to sculpt on that level, we'd get a completely photo-realistic render by just giving it the image of a tree bark.
We don't have an ideal engine nor an omnipotent sculptor though.
So what we need to do to make it more realistic is tell it how it should actually interact with the light as if the surface already had those irregularities. We need to tell our plane to pretend as if it wasn't just a plane.
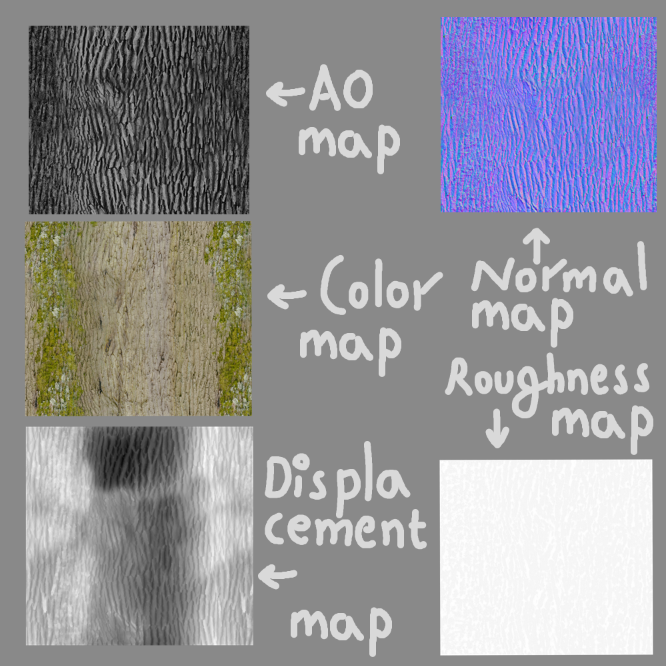
We can do this by assigning it different kinds of images that give it information on what to pretend.
Some images used for this purpose are,
- bump map: The white makes the plane pretend to be raised and the black to be creased.
- roughness map: So the plane knows where it should be shiny and where it should be dull
- displacement map: Displaces the actual geometry, if your model is high poly enough for it.
- AO map: Dictates places that should be occluded.
- metalness map: So the plane knows where it should be metal-like and where not.
Here's how these images look.
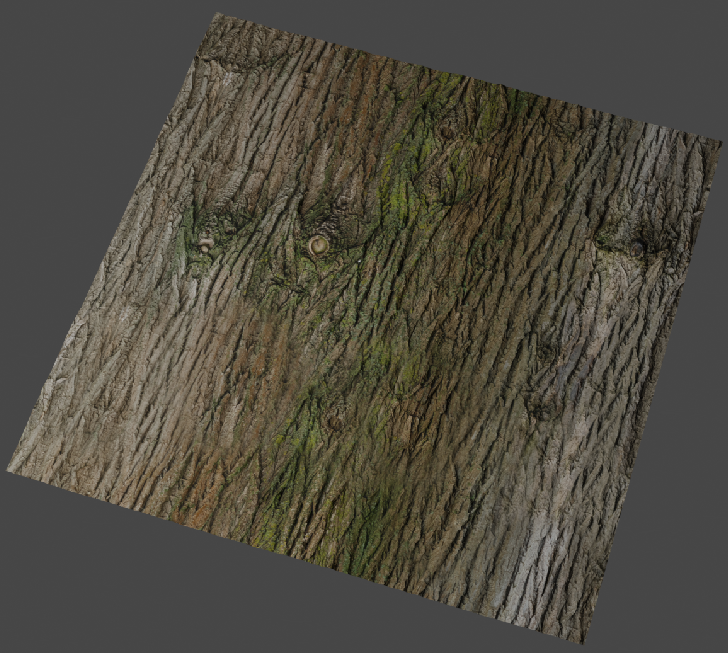
 And if we utilize all the images we just saw, we'll end up with a result that looks way more realistic and appealing than our previous attempt.
The Material can be as complex as we just saw, or a simple plain color.
ThreeJs Provides a way to effortlessly create simple materials and pass in different maps as parameters for complex ones.
But how are textures applied on complex 3D models from a single image? Let's take a cube for example.
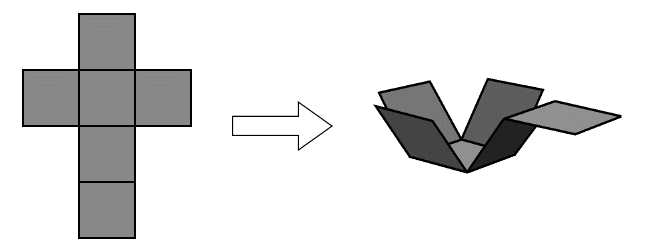
The cube can be easily be cut up along the edges and be unfolded flat. This process is called UV Unwrapping
The flat projection of the cube, called a UV Map can then display the parts of the image it overlaps with.
All 3D models go through a similar process if they have a texture.
We'll see more about texturing in detail in future chapters
If you've downloaded a model off the internet, it's already textured and you don't have to worry about either geometry or texture.
If you need textures, you can get them online at places like poly haven, poliigon, texture lib, ambient cg and many more such places! (Or you can directly texture paint a model in Blender, Z-brush and the like)
Now that we have populated our scene, we need some illumination to actually see our models, so let there be Light (and Shadows).
Lights and Shadows 💡👤
Expensive. If there's one thing I want you to take away from this section, it's that both Lighting and Shadows are expensive.
Lights 💡
There are a plethora of Lights you can choose from in ThreeJs, there's the omnipresent Ambient Light that illuminates everything equally, there's the Point Light which emits Light in all directions from a singular source, there's a Directional Light like the sunlight, there's Spot Light, Hemisphere Light and Rectangular Area Light.
A bunch of lights that can illuminate in a bunch of ways.
Lighting is essential to any 3D experience, it not only allows you to actually see areas of your scene well, a clever lighting setup with contrasting hues, visual cues and other design tricks will enhance the experience many folds!
While it is an excellent tool that we can make use of to enhance, it's a tool that we're often not able to afford.
Lights take a lot of computational power (some more than others), they increase the complexity of the scene by a lot and it's usually not a good idea to add too many lights to your scene.
Shadows 👤
Yes, there's a reason I've been mentioning Lights and Shadows separately, Shadows are something that are optional to have and for good reason, shadows on their own are very expensive to calculate and as such shouldn't be overused.
But Heaust, doesn't adding Lights automatically mean that you're getting shadows too since a shadow is nothing but an absence of light and wherever light doesn't reach should be dark?
Yes that would be the case if we were were using a Ray Tracing engine, but as we've already discussed we're using something called Rasterization, which doesn't actually calculate the render using light but distance from the camera instead.
And since we don't automatically get shadows, we have need to calculate Shadow Maps separately to get the shadows.
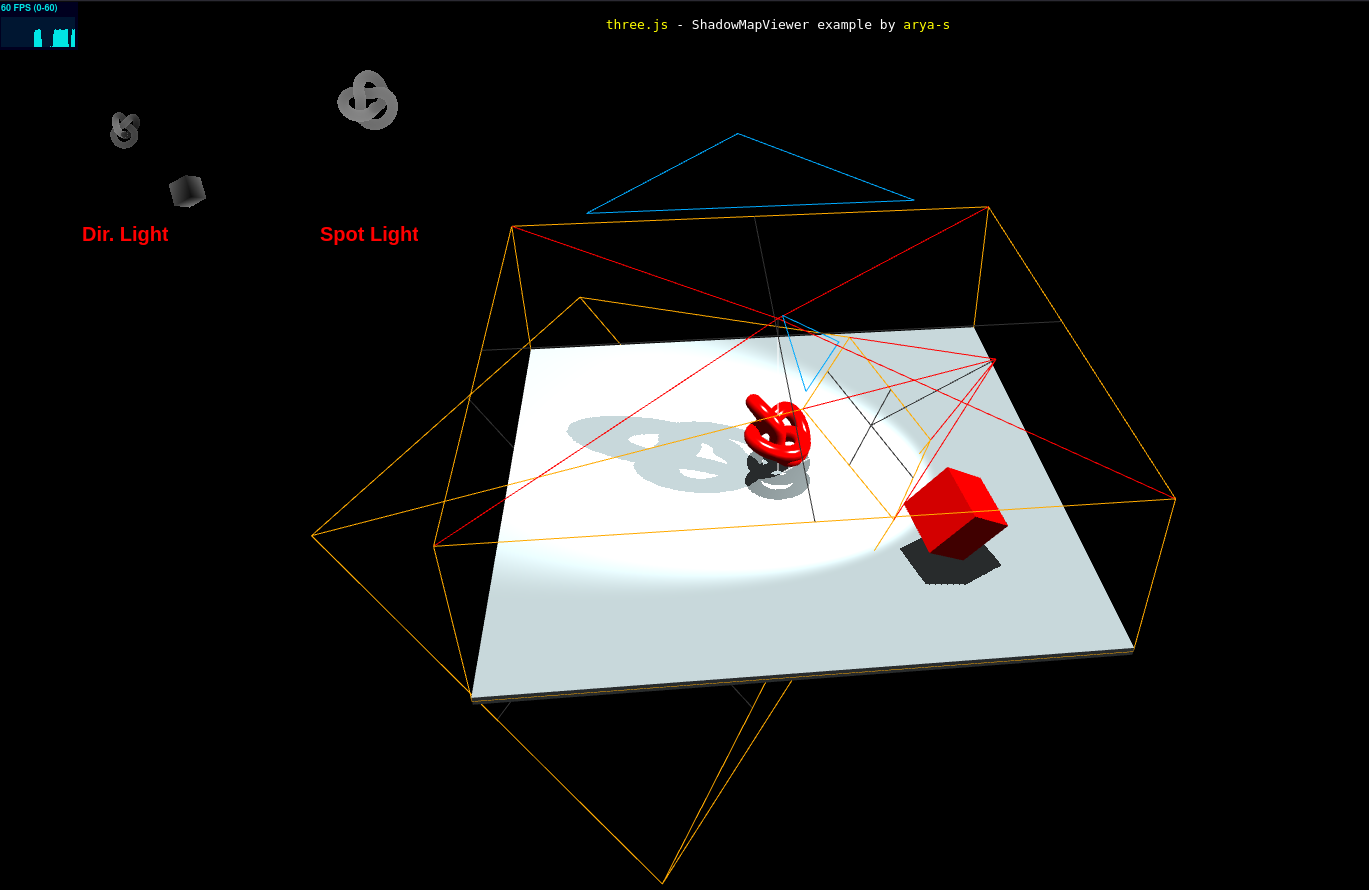
As you can see top left in this example, the renderer has to render shadow maps for each light it's calculating shadows for on every frame along with the main render.
You can guess how significantly this would impact the frame rate if for every frame you have to do multiple renders!
So a good rule of thumb would be to only use shadows if absolutely necessary and only for dynamic elements.
We'll talk about Lighting and Shadows in detail in future chapters
So... we can't use a lot of Lighting, and we can't even have any Shadows, are we doomed to suffer the cruel fate of mediocrity and bland design?
Nope, all isn't lost yet!
Baking 🥧
Since Everything we see is color anyway, we can paint the textures of surfaces to be dark or bright according to the environment we design for it! (we don't have to personally do it, Blender or other CG software can do it for us).
This removes the need to enable shadows altogether in static environments!
It's a great way to get all the performance without compromising any of the experience.
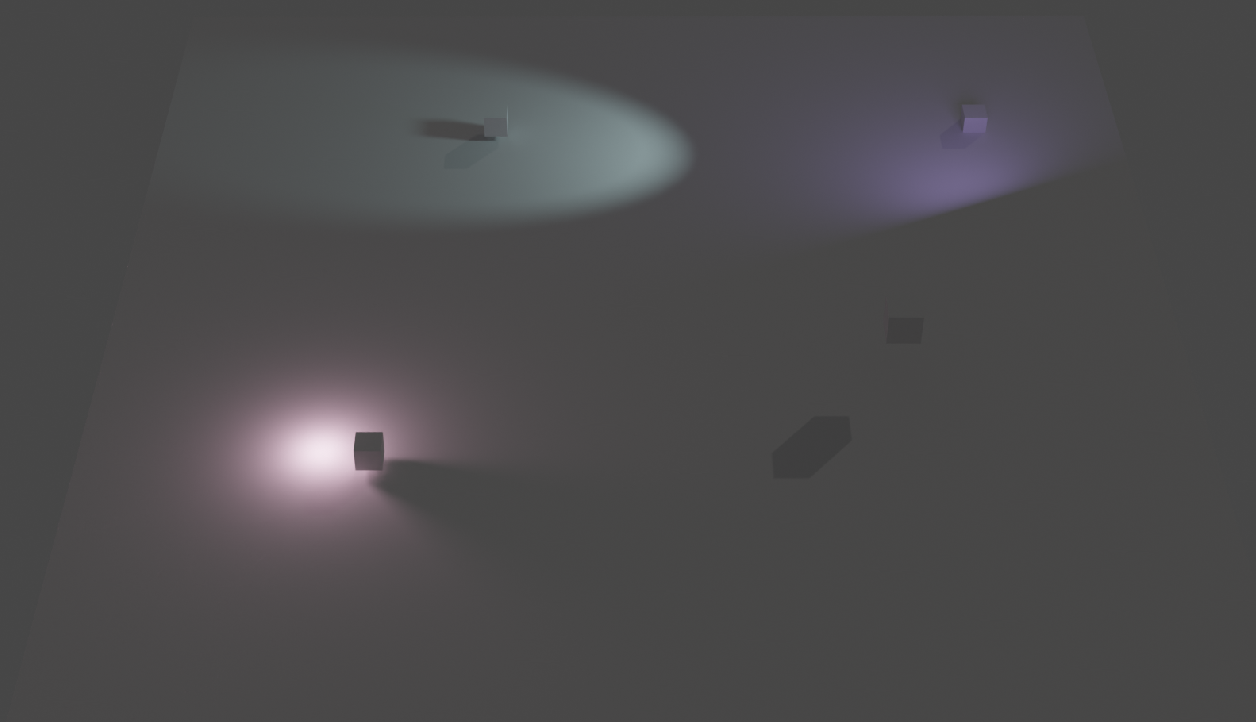
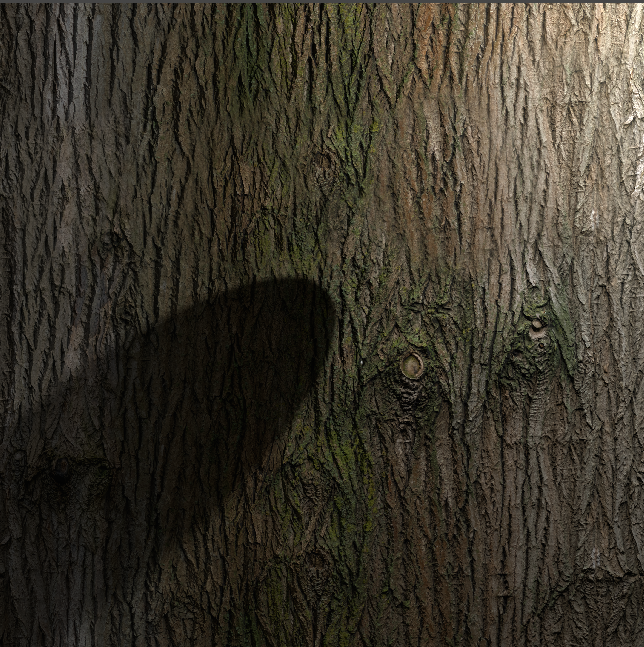
Here's what I mean, take a look at this render.

It's clear that the sphere is casting a shadow on the plane from a light coming from somewhere in the top right, right?
Nope! this entire thing is a facade, the shadow and highlights are painted (baked)!
There isn't a single light (other than ambient) in that scene. Here's how the texture for the plane looks.
So a lot of the times, you'll see we don't even need Lights and Shadows, we can just create clever illusions with baking that they're already in the scene.
For shadows of moving objects we can animate a plane with a Shadow texture.
Moreover we can add environment maps to shiny objects to tell them what to reflect so they don't have to waste time calculating.
We'll look at that and Many more things in future chapters.
MIP Mapping 🗺️
We know how we give textures to our models via images now.
The images we provide though, are 2D, and the models are 3D, So it stands to reason the closer parts of the model should be larger and the further parts should smaller, compared to our original image at times.
That means at some point that image has to go through a process of being enlarged and / or shrunk.
For shrinking what happens is your GPU takes your, say, 1024x1024 image, halves it to 512x512 and saves it, halves that to 256x256 and saves it and so on till it gets a 1x1 image.
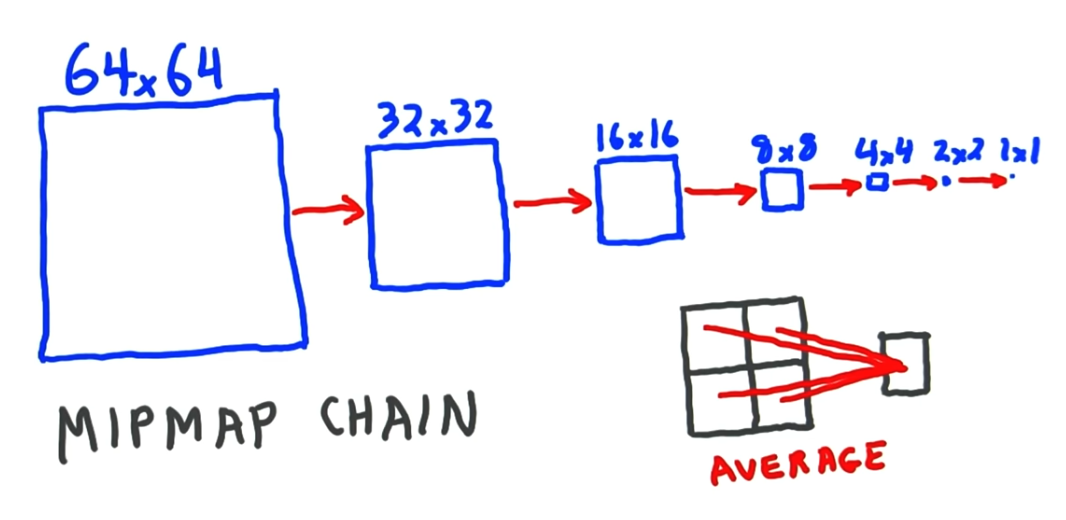
It goes through this process so that if it ever has a need of a smaller res image, it already has it all computed and doesn't have to render from a high res image which really isn't as optimized and results in inaccurate rendering and noise.
So the takeaway from this is, always have your texture image's resolution in powers / exponents of 2, you will not be able to use mipmapping otherwise.
There are times that mipmapping will work against you though, if you want a pixelated look on your textures like in minecraft, you should probably turn mipmapping off as it results in blurred images when images get too stretched (this is usually desirable as we don't often want a pixelated look).
Skybox ⛅
Imagine your entire world is inside a Cube, now give that cube a texture to give the illusion of a 3D environment. That's a skybox and ThreeJs Makes it really easy to implement.
Think something like google street view.
Conclusion
Now you're completely ready to just dive into the api docs of ThreeJs and start creating amazing 3D web experiences.
If you're too lazy to read through all of that on your own though, stick with me for our next chapter, Create a Spinning 3D Model.
That's right! All of the theory is over (for now), we're getting our hands dirty with code for the next few chapters of the series!
Thanks for reading and Congrats! for making it all the way to the end. If you've never heard about this stuff before, I know it can be hard to wrap your head around, but give yourself a pat on the back! Now you'll be able to more intuitively navigate the CG world whether it's for creating awesome websites with ThreeJs or anything else.
See you in the next Chapter! I hope you learned something : )
[If you need to contact me, you can email me at heaust.azure@gmail.com]